An American author from the 20’s – John A. Shedd – once wrote, “A ship in harbor is safe, but that is not what ships are built for.” So true these words of wisdom are, and it applies to our 4-wheel drives quite nicely, thank you. We can build or have built, the baddest, most capable off-road vehicle, and as long as it sits in our “harbor”, we don’t ever have to worry about getting hurt. It’s when we take our rigs off road and put it in precarious positions that safety becomes an issue, real quick.
We knew when we started planning the build for Project Buckshot that a roll cage would adorn its interior. The original plan was to purchase the tubing and make our own, but the local price of tubing was more than the cost of nearly every kit that we looked at. So, we set out to find a roll cage kit that fit our needs. We looked for the following:
 Must be made with high quality steel tubing, at least .090 in thickness Must be made with high quality steel tubing, at least .090 in thickness- Must be a weld-together kit
- Must have at least 6 points to attach to the body of the vehicle
- Must provide good head clearance and clearance for seats, dash, etc.
We started our search at Tom’s Bronco Parts‘ web site and didn’t have to go any further. We settled on their Deluxe Family 8-point “interior bar” (part # 1427), which comes pre-bent, as a kit. The bars are made from high quality ERW steel tubing, which is .120” thick. Moreover, 90% of the tubing comes with bird-mouthed (notched) ends (only the front bars need to be trimmed and notched) and the rest of the cage comes cut-to-length. It immediately exceeded our needs, and at time of publishing cost only $500 – nice!
With kit in hand, we set forth to build a roll cage for Project Buckshot.
| Installation – Tom’s Bronco Parts 8-Point Family Roll Cage for Early Broncos |
| Time: |
8-10 Hours |
| Tools Needed: |
welder, tube notching tool (grinder, plasma cutter, tubing notcher), grinder, clamps, right-angle/arrow magnets, level(s), angle finder(s) |
| Difficulty: |
 |
Installation
Roll cage assembly and installation
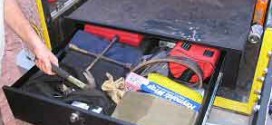
  We prepped our vehicle by removing everything from the interior and disconnecting the battery. We then laid out the Tom’s Bronco Parts components (tubing, foot plates and bag of nuts and bolts) took stock of the inventory. Notice the high quality bird mouth notches in the tubing. This makes welding the kit together VERY easy. We prepped our vehicle by removing everything from the interior and disconnecting the battery. We then laid out the Tom’s Bronco Parts components (tubing, foot plates and bag of nuts and bolts) took stock of the inventory. Notice the high quality bird mouth notches in the tubing. This makes welding the kit together VERY easy.
|
 Getting started with the rollcage is pretty tricky – you’ll need a second (or third) set of hands to stand up the rear-most and mid hoops, then get the spreaders put into place. Ratchet straps, clamps and magnets help. Take your time and measure everything 4 or 5 times on this step, as the entire rollcage builds off of this point. Getting started with the rollcage is pretty tricky – you’ll need a second (or third) set of hands to stand up the rear-most and mid hoops, then get the spreaders put into place. Ratchet straps, clamps and magnets help. Take your time and measure everything 4 or 5 times on this step, as the entire rollcage builds off of this point. |
 With the rear-most and mid hoops standing in their correct orientation and the two rear spreader bars set in place, lay in a few tack welds to get this section standing on its own. We suggest putting down 3-4 tack welds for each connection point so that it’s sturdy enough that you can move things around a bit. With the rear-most and mid hoops standing in their correct orientation and the two rear spreader bars set in place, lay in a few tack welds to get this section standing on its own. We suggest putting down 3-4 tack welds for each connection point so that it’s sturdy enough that you can move things around a bit. |
  Next, place the wheel well bars onto the mid-point (main) hoop and slide it down onto the wheel well with a footplate underneath it. You may need to trim the base of the tubing so that the angle matches the footplate. Do this for both sides. Next, place the wheel well bars onto the mid-point (main) hoop and slide it down onto the wheel well with a footplate underneath it. You may need to trim the base of the tubing so that the angle matches the footplate. Do this for both sides. |
  Place the wheel well bar into place and secure it with a magnet or a tack weld. Then, step back and look down the length of your Bronco to make sure all of the bars are aligned for pitch, plane and yaw (in short, make sure everything is aligned and square). Place a long straight edge along these three tubes if you can, then lay in a few heavy tack welds to secure everything. NOTE: If you don’t have a right-angle / arrow magnet as seen in this picture, we highly recommend you get yourself a few – it makes jobs like this easier. Place the wheel well bar into place and secure it with a magnet or a tack weld. Then, step back and look down the length of your Bronco to make sure all of the bars are aligned for pitch, plane and yaw (in short, make sure everything is aligned and square). Place a long straight edge along these three tubes if you can, then lay in a few heavy tack welds to secure everything. NOTE: If you don’t have a right-angle / arrow magnet as seen in this picture, we highly recommend you get yourself a few – it makes jobs like this easier. |
  Your rear roll cage section should look like this when you are done. Note how the quality bird mouth notches fit the tubing perfectly. Your rear roll cage section should look like this when you are done. Note how the quality bird mouth notches fit the tubing perfectly. |
 Next comes the hard part… building the front portion of the roll cage. We started with the two main front bars – suffice to say, you’ll spend as much or more time on this part of the rollcage than all of the rest combined. Prepare for lots of measuring, trimming, measuring, trimming, etc. Double check the height and location of these two front main bars to make sure it will clear a hard top or soft top, as well as your dash board. Use of several clamps and magnets makes this job easier. Next comes the hard part… building the front portion of the roll cage. We started with the two main front bars – suffice to say, you’ll spend as much or more time on this part of the rollcage than all of the rest combined. Prepare for lots of measuring, trimming, measuring, trimming, etc. Double check the height and location of these two front main bars to make sure it will clear a hard top or soft top, as well as your dash board. Use of several clamps and magnets makes this job easier.
|
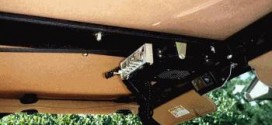
  With your two front bars cut, notched and ready for installation, we found that using a few ratchet straps helped the installation of the overhead bars and the dash bar. With a few extra hands and a couple of ratchet straps, you can assemble the entire front portion of the rollcage without ever laying down a single tack weld. And, you can adjust and measure everything until its perfect. With your two front bars cut, notched and ready for installation, we found that using a few ratchet straps helped the installation of the overhead bars and the dash bar. With a few extra hands and a couple of ratchet straps, you can assemble the entire front portion of the rollcage without ever laying down a single tack weld. And, you can adjust and measure everything until its perfect.
|
  Once the front portion of your roll cage is aligned, plumb and square, you can lay in some heavy tack welds. Once the front portion of your roll cage is aligned, plumb and square, you can lay in some heavy tack welds. |
  Work your way from opposite corners when laying in your heavy tack welds, this will prevent the metal from creeping on you. Your rollcage should now be assembled, square and ready for final welding. We double-checked all of our measurements and ensured everything was aligned perfectly. While still in the vehicle, we laid in some short stitch welds to ensure alignment, before we removed it from the vehicle. Work your way from opposite corners when laying in your heavy tack welds, this will prevent the metal from creeping on you. Your rollcage should now be assembled, square and ready for final welding. We double-checked all of our measurements and ensured everything was aligned perfectly. While still in the vehicle, we laid in some short stitch welds to ensure alignment, before we removed it from the vehicle. |
  Next, remove the rollcage from your vehicle… trust us, it is far easier to lay down some quality, hot welds when you can flip the roll cage in any direction you like. Remember, your life and limb may very well depend upon the quality of your welds! Next, remove the rollcage from your vehicle… trust us, it is far easier to lay down some quality, hot welds when you can flip the roll cage in any direction you like. Remember, your life and limb may very well depend upon the quality of your welds!
|
  Working from opposite corners of the roll cage, lay in your welds. If you take your time and move your welds from corner to corner, you will get little to no warping of the roll cage and when you are done it should drop right back into your Bronco perfectly. Working from opposite corners of the roll cage, lay in your welds. If you take your time and move your welds from corner to corner, you will get little to no warping of the roll cage and when you are done it should drop right back into your Bronco perfectly.
|
 Take your time and lay in quality welds… again, safety depends upon it. When you are welding, you should have clean, nearly spatter-free welds, with even heat distribution. They should look like this. Take your time and lay in quality welds… again, safety depends upon it. When you are welding, you should have clean, nearly spatter-free welds, with even heat distribution. They should look like this.
|
  At this point, you can paint your roll cage and drop it back into your vehicle (we’ll paint ours later). You then need to drill the foot plates and secure it to the body. At this point, you can paint your roll cage and drop it back into your vehicle (we’ll paint ours later). You then need to drill the foot plates and secure it to the body.
|
 We chose to make a few modifications to our rollcage. We added front floor spreaders to stiffen up the cage a bit. From there, we tied in perpendicular tubes that our Smittybilt seats and Tuffy Security Products center console would mount to. We chose to make a few modifications to our rollcage. We added front floor spreaders to stiffen up the cage a bit. From there, we tied in perpendicular tubes that our Smittybilt seats and Tuffy Security Products center console would mount to. |
   We also added some Blue Torch Fab Works gussets to our roll cage for a bit more strength, and we welded in an “oh shit!” handle for the front passenger. We also added some Blue Torch Fab Works gussets to our roll cage for a bit more strength, and we welded in an “oh shit!” handle for the front passenger. |
  Lastly, we welded in some grab handles for the front passengers, to make getting in and out of the rig a bit easier, as well as giving them a place to hold when their off road and off camber. Lastly, we welded in some grab handles for the front passengers, to make getting in and out of the rig a bit easier, as well as giving them a place to hold when their off road and off camber. |
The Verdict
The Tom’s Bronco Parts Deluxe Family 8 Point Interior Bar (a.k.a. Roll Cage) is an amazing kit and we can’t say enough great things about it. The cost is right and the instructions are good, considering that applications and vehicles will vary a bit.
 The tubing for this kit is made from high quality ERW steel tubing, measuring .120 inches in thickness, making it strong and durable. Nearly every bar comes cut-to-length (perfectly) and pre notched (bird mouthed). Aside from the two front main bars and some slight trimming for the foot plates, the entire kit assembles perfectly without alteration. The tubing for this kit is made from high quality ERW steel tubing, measuring .120 inches in thickness, making it strong and durable. Nearly every bar comes cut-to-length (perfectly) and pre notched (bird mouthed). Aside from the two front main bars and some slight trimming for the foot plates, the entire kit assembles perfectly without alteration. The Tom’s Bronco Parts roll cage also has a great look to it. The smooth curves that fit to the front dash, the bends in the hoops, and the rear wheel well tie-in bars set this roll cage apart from any other garden variety roll cage.
We do wish the footplates were several inches bigger in all directions though, to spread the load more evenly, in case of a roll over. As such, we’ll be tying our roll cage into the frame to add a bit more safety. If you don’t have access to a tubing bender, you could simply head to your local steel supply, and ask them to sheer off 8” X 8” or 6” X 6” steel plates too.
Overall, we’re very pleased with the Tom’s Bronco Parts roll cage and would recommend it to anyone interested in a roll cage for their Early Bronco.
|
|
| Blue Torch Fab Works |
3211 11th Ave. North
Birmingham, AL 35234
Toll Free: 866.RCK.CRWL
Toll Free: 866.725.2795
Local: 205.521.7333
Fax: 205.521.7343
Web: www.bluetorchfab.com |
|
|
|
 4x4Review Off Road Magazine