4x4Review Off Road Magazine

Dan Pitts, even at age 17, has got his priorities straight and the confidence of youth on his side. Putting in long hours after school at his Uncle’s garage, he’s saved up his hard-earned clams to turn his relatively stock ’87 Toyota mini truck into a rock crawler, and he isn’t afraid of body damage either. Rolling into the shop with only 32″ tires and a lunch box locker in the rear axle, Dan is ready for us to tear into his ride.
The goal: turn this stocker into a capable trail rig, ready for the rocks, the trails and just about anything else.
With that blank slate, we decided to start with something that would catch people’s eyes, add a level of safety to his off-road adventures, scale to fit his needs as the rig is molded, and add some trail armor in one fell swoop.
The task: ditch the home-made truck bed, for a slick, tubular flat bed conversion kit from All-Pro Off-Road that would allow for some big tires and trail armor.
We put a call into our Toyota-expert friends at All-Pro Off-Road in Hemet, CA and ordered their All-Pro Flat bed kit (part # 2500-AP-KT). Their flat bed kit is the perfect balance of form and function. Comprised of 1 ½” .120″ wall DOM round tubing and 1″ .120″ wall square tubing, it looks cool, and it’s beefy as hell too. It’s also designed so that you can modify several aspects of the build to make your All-Pro flat bed kit unique to your rig.
So if you’re ready tackle the All Pro Flat Bed conversion kit, you’ll need to bust out yo’ mad fabrication skills, set aside 3 or 4 weekends, a bunch of 40 ouncers in paper bags, and line up a bunch of tools. Take note as you’ll need a right-angle grinder, a welder, a chop saw or hack saw, a tape measure, an angle finder, a whole-saw or a tubing notcher, a couple levels, several medium and large clamps, a reciprocating saw and a few other small fabrication and hand tools – oh yeah, a plasma cutter will make this job a lot easier too, but you can get away with a torch set or a skill saw that has a metal cutting blade. When it’s all said and done, you’ll have yourself a trick, rolling jungle gym with enough bars for you to get your monkey-awn.
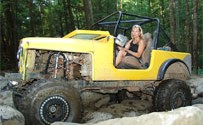
Before we get into the how to, here’s an example of what your pickup could look like before and after its transformation from zero to hero, stock to rock, or street queen to trail king.
 Before All-Pro Off-Road’s Flat Bed Conversion |
 After All-Pro Off-Road’s Flat Bed Conversion |
The Build – Frame Prep

After you get your All-Pro Off-Road Flat bed conversion kit, take a quick inventory and make sure everything is there. Once you have all your parts and tools lined up, it’s time to ditch the OE body parts and hack away at your rig. Here’s what separates the men from the boys, so take a deep breath, as you’ll be ditching the stock bed, cutting away many, many parts of the frame and other structural components in favor of a stronger, better truck bed. To make things more challenging, don’t expect to find any instructions in your All-Pro Off-Road Flat bed kit collection.
Start this project by ditching the entire bed of your truck, or in our case, nuking the existing, home-made flat bed that was already on there. With the bed of the truck chucked into your neighbor’s yard, we suggest removing the gas tank and pulling back as much wiring as possible to avoid turning your garage into a giant meat smoker.
With the frame exposed, start cutting – and I mean cutting big. This is one of those points in this project where you’ll want to take your time and do the right thing – there’s little going back once you’re underway. Cut off all of those old body mounts, grind away the extra material and welds, and get the frame smooth.
With the frame prepped, we set the main hoop and spreaders in place so we knew how far to cut the ends of our frame rails back. In our case, it was about 6 inches. We also cut our exhaust back to get it out of the way too.
| Frame Prep | ||||||
| Time: | 3-4 Hours | |||||
| Tools Needed: | right angle grinder(s), misc hand tools, reciprocating saw | |||||
| Difficulty: |  |
|||||
|
||||||


The Build – The Primary Tubing Structure

Now its time to set the main hoop and primary runners into place. Take your time with this portion of the build because this is the absolute foundation that the rest of the entire kit will be built upon. It’s also important that during this build you should only tack weld everything that you are building because you’ll likely need to readjust several times before you can move on. Think 3 or 4 steps ahead of where you are.
Start by setting the main hoop near the back of the truck cab on top of the frame rails. We chose to cut to horizontal “V” notches into the bottom of the main hoop so that it would sit on both the top and part of the sides of the truck frame, giving it some additional lateral strength once completed. We set our main bar within 1 inch of the back of the bed, which would give enough room for some body flex, and to get our skinny meat-hooks inbetween during our annual washing. You’ll also need to adjust the height of the main hoop as well, as it may be a couple inches too tall. Our truck came to us with a very temporary 3 inch body lift, so we took that into consideration as we cut the height of the main hoop. In the end, your main hoop should be right at, or a ¼” taller than the top of your truck cab. Ensure the main hoop is plumb and level, then tack it into place. This is the first and last part of the build that is easy so congratulate yourself at this point because from now on, you’ll be breaking out your trusty Texas Instruments calculator and using your old man’s slide rule.
Since during the rest of this project you will deal with a lot of angles and compound angles, remind yourself that each time you reduce the length of a piece of tubing, you’ll also adjust the height or width – that said, take your time and be CONSERVATIVE! Measure 3 or 4 times and make many small cuts.
At this point it was time to start notching some tubing, so we broke out our trusty and affordable Mittler Bros Deluxe Aluminum Hole Saw Notcher to make clean and accurate cuts. You can attempt this with a right angle grinder or maybe even a hole saw attached to your drill, but you’ll save many hours, knuckle skin and hole saw bits over the life of this project if you use a hole saw notcher. This is also where a protractor, magnetic angle finder, and scratch paper come in handy, as you’ll need to calculate your angles before you start notching.
With your measurements and angles calculated, notch the forward end of the primary runners and set them against the main hoop, and onto the rear portion of the frame. Check you distances and angles, and if you haven’t trimmed the frame rails yet, you can now mark and cut. We left about ½” of frame rail past the rear-most portion of the primary runners. Get the spreaders plumb, level and square to the frame and main hoop, then tack them into place.
| Building the Primary Tubing Structure | ||||||
| Time: | 3-4 Hours | |||||
| Tools Needed: | right angle grinder(s), misc hand tools, reciprocating saw | |||||
| Difficulty: |  |
|||||
|
||||||


The Build – The Remaining Frame Structure

With your main hoop and primary runners securely tacked in place, it’s now time to tackle the tougher, yet more satisfying parts of the job. This is where things start to take shape and you can appreciate your efforts.
We started by measuring how high we wanted our fender wings to sit (for lack of a better term, we’re calling the upper portion of the flat bed the “wings”). We determined that we needed enough room for 35″ tires under full compression and set the wing bars roughly 7.5″ above the rear-most portion of the frame. With our height noted, we transferred that height to the main hoop so we could install the horizontal main-hoop spreader. Here you will need to not only shorten the spreader, but notch the tubing at an angle so that it can be tack welded in place.
With the horizontal main-hoop spreader tacked into place, we then started working on the wings. If you’re a tenderfoot when it comes to pipe-fitting skills, I can’t stress enough how important it is to take your time and measure many, many times. If not, you’ll end up with some mad squabbles and a few wrenches chucked across the room.
We started by determining how far we wanted the wings to stick out and settled on more of an angular look. We chose a setup that would push the wings out far enough to give us some trail armor and give it an aerodynamic look at the same time, but you can also make the wings go down the length of the truck in a straight line too. We recommend notching the forward portion of the wing tubing and leaving it a bit long (roughly ¾” or so) and then holding your wing in place to mark where you will cut the rear portion. With your measurements noted, notch the tubing and if it fits well, tack weld the wing into place.
If your wings and horizontal main-hoop spreader are square, level and plumb, it’s time to build the wing framework. By comparison, this part is pretty easy. We started by measuring and cutting the long square tubing that will serve as the front-to-rear frame support for the wing body panel. Here you will need to make one decision: Do you want your wing body panel to sit flush with the wing tubing, or do you want it to sit on top of the wing tubing? We chose the latter to give it more of an industrial look. If you want it to sit flush, you’ll need to lower this square tubing by the thickness of your body panel metal. The 1″ DOM square tubing was easy to work with and we did most of our notching with a grinder in a matter of a few minutes. Once your square tubing is cut and notched, set it in place, make sure it’s level, then tack weld to the horizontal main-hoop spreader and the primary runner. Next you’ll need to measure and cut 4 wing spreaders (2 for each side) and then tack weld them into place as well.
If all of your work is plumb, level, square and exactly where you want it, you can lay your permanent welds where the primary runners attach to the main hoop, where the horizontal main-hoop spreader attaches, and on all of the square tubing. Do NOT make final welds for your flat-bed kit to the frame though as this should be the absolute last thing you do.
| Building the Reamining Frame Structure | ||||||||||
| Time: | 5-7 Hours | |||||||||
| Tools Needed: | right angle grinder(s), tubing notcher, angle finder, level, right-angle magnet, welder | |||||||||
| Difficulty: |  |
|||||||||
|
||||||||||


The Build – Installing the Cross Member and Vertical Primary Runner Supports

The last few items left to complete the major framework of the All Pro Off Road Flat Bed kit is to install the rear cross member and the vertical primary runner supports. This, in comparison to most of the other work, is also pretty easy.
We wanted a break from measuring, calculating angles and wracking our brains with geometry, so we decided to install the rear cross member. Start by grinding and cutting away the OE cross member. With it removed, prep the frame area and remove the old paint and any rust that may have built up over the years. The cross member supplied by All Pro Off Road shouldn’t need to be cut, but may need to be smacked into place with a heavy mallet. With the cross member level and flush with the frame rails, lay in some heavy welds to finish it up. You’ll come back later to put your taillights and supplied receiver hitch into place.
To finish up the framing portion of this project, you’ll need to mark where your primary vertical runner supports will mount. We chose to mount ours directly in line with the OE round cross member to give the kit added strength and then measured the height from there. Notch your runner supports to match the angle of the primary runners and then cut the length to match as well. Next, we cut and bird mouthed the primary square tubing on the wings so that the primary runner support would fit inside. Check the support to make sure it’s square to the wings and frame, ensure it’s level and plumb, then weld it to the runners and the square tubing. Once again, do NOT weld it to the frame as you’ll need to remove the flat bed kit framework from the truck later.
| Building the Reamining Frame Structure | ||||||
| Time: | 3-4 Hours | |||||
| Tools Needed: | right angle grinder(s), tubing notcher, angle finder, level, right-angle magnet, welder | |||||
| Difficulty: |  |
|||||
|
||||||


|
|