4x4Review Off Road Magazine

When you move to a new town it can be quite frustrating when you can’t find the resources you once had. Resources such as a good supplier of nuts and bolts, a reputable parts store that will carry your oddball truck parts, a good fabricator and so on. After moving to Indianapolis a few years back, it’s taken me quite a while to build up my list of trusted partners that I need to work on our project vehicles.
While searching high and low for a good exhaust specialist, many folks recommended Kent’s because of their experience working with custom hot rods, trucks, RVs and more. Kent’s also offers more than custom exhaust work, but we’ll come back to that later.
As we were getting close to wrapping up our project Land Cruiser, one of the few remaining items left on our list to make our rig roadworthy was the exhaust system. Our list of demands for our custom exhaust read like this:
-
The exhaust tubing must always be above the bottom of the frame and should be 100% clear of any obstacles the rig might come into contact with when venturing off road.
-
The tubing must clear all moving parts and not be too close to any tubes, cables or the likes so that it wouldn’t overheat them.
-
The entire exhaust system should be built in sections so that we can disassemble parts of it to perform work on our rig, but not have to remove the entire exhaust system. Example; to change the oil, we’ll need to be able to remove the Y-Pipe section.
-
For clearance reasons, we wanted a single exhaust tube down the length of the vehicle.
-
The passenger side collector and down pipe should be routed in front of the curve of the oil pan and join the driver side exhaust system without interfering with the suspension or front driveshaft.
-
The complete exhaust system should be of quality aluminized or stainless components so that it can endure the constant off-road riggers and beatings.
-
It should be affordable!
Our list was a tall order for any exhaust shop, but as you’ll see, Kent’s Automotive pulled through. Read on to find out why we did what we did and maybe you’ll walk away with some ideas on how to route your vehicles exhaust system.
Pre build:
Before Randy from Kent’s automotive began building the exhaust system, we discussed what type of equipment we were going to use. We decided that 2 ¼” diameter, 14 gauge aluminized tubing from IMCO would be the longest lasting and toughest tubing we could use, given our budget. We discussed other options like larger tubing but decided that given the tight path and multiple bends that would have to be made, that 2 ¼” tubing would be a sufficient diameter to allow our V8 to breath. Further, the stainless tubing would be more expensive and harder to bend.
We also talked about mufflers at length and decided on an IMCO muffler. Our IMCO muffler is made of 16 gauge 409 Stainless steel (every component of the muffler is 409 stainless), is of all welded construction and has one really sweet note! The deep, subtle sound is similar to a Flowmaster 40 series, but much quieter. That is, until you put the pedal to the floor and then it opens up some, but still considerably more quiet. IMCO gets its unique sound by installing a “Flow Wing” V baffling system, which separates the exhaust gases and changes the frequency as they join together again. These IMCO mufflers come in 60 different configurations and are available in both 16 gauge 409 stainless steel or aluminized & painted 16 gauge steel for those on a tighter budget. Our IMCO muffler has a lifetime warranty as well.
Exhaust routing:
As you can see, we chose to route our passenger side collector and down tube across and in front of the curve of the oil pan on our Chevy 350 c.i. engine. Due to the Turbo 350 Transmission and Dana 300 TCase, we simply didn’t have room for exhaust to travel down the passenger side and be joined behind the TCase as most stock applications do. This meant that Randy had his work cut out for him.
Randy started by mocking up the entire exhaust system in his head and then adjusted the direction, angle and length of the downpipes and collectors so that they could be joined and clear all other components on our rig.
The next step was to start building the complete Y-pipe assembly and as you can see, this exhaust section had about 5 bends in just a few, short feet of area. Randy also fabricated the joining section by birdmouthing the passenger side of the pipe so that it could lay into the driver side pipe. Using a cutting torch, Randy opened up a lengthwise, oval section of the driver side pipe where the passenger side pipe could be welded and joined together. This was by far the most complex portion of our exhaust system, but Randy’s 20 plus years of experience helped him knock this out in about an hour.
With the Y-Pipe completed, Randy then installed gasket flanges behind the y-pipe so that we could drop the y-pipe section to perform maintenance (e.g. change the oil, remove the oil pan, etc.) as needed without having to completely disassemble the exhaust. The flange was placed in front of and above the skidplate, to ensure we had adequate clearance.
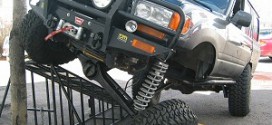
Randy then laid in a long section of straight 2 ¼” tubing that would run above the skidplate, next to the frame rail. A short bend was made at the end of the pipe so that the muffler would run up along, following the curvature of the frame, keeping it also out of harm’s way.
Next, Randy fitted the muffler to the end of the long pipe and supported it with an adjustable muffler stand. We chose to run the muffler up high to keep it clear, but with enough space above so that it wouldn’t overheat the floorboard of the rig.
With the long Y-Pipe, long pipe and muffler all fitted into place, Randy welded the exhaust gasket flange into place and hung heavy-duty, rubber bushing exhaust hangers to secure the exhaust system.
Moving onto the tailpipe section of the exhaust, 6 or so bends were made in the pipe to give it clearance for the shock absorber, the axle, and the leaf spring. Some of you might be asking why we didn’t install a simple turn-out that came right out of the end of the muffler. I asked the same question and Randy informed me that exhaust gases are corrosive in nature and if they aren’t vented behind the vehicle, it would corrode and rust the bottom of the vehicle. Not to mention it could cause the exhaust fumes to enter the vehicle from below. Neither of which we wanted.
With the tail pipe bent, installed and welded up, Randy demonstrated his work by performing several pull-ups on the exhaust showing how durable it was.
Before lowering the lift, Randy spent time going through the entire exhaust system double-checking for quality of work and painting all of the welded and joined areas with hi-temp, ceramic impregnated paint to prevent corrosion and rusting.
The last test was to lower the rig from the lift and fire it up. I drove it around the block a few times and absolutely loved the sound! The IMCO muffler is quiet at idle with an aggressive, deep note and loud enough during heavy acceleration to let all those around you know that you have a V8, but still quiet enough that you don’t have to yell to your passenger to carry on a conversation.
We’ve been running our exhaust now for nearly 3 weeks and have had no problems or leaks. All in all, we’re very happy with the service Kents Automotive gave us and the products we purchased from them.