4x4Review Off Road Magazine
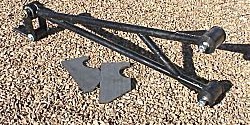
 When surrounded by an over abundant number of Jeeps, Landcriusers, Samurais, etc., it was frustrating to me that there are a limited number “trick” parts out there for the “full sized rigs”. When I read about the JKS swaybar disconnect kit available for Jeeps, I thought to myself why couldn’t us full size guys have the same benefits? Well, low and behold the guys at Offroad Design in Carbondale Colorado answered my call for help. Stephen Watson designed a kit that is both functional and easy to install. Other companies have since come out with a disconnect kit for full size Chevy’s, but cannot compare to the ease of install and use of the kit from Offroad Design. Follow along with the install instructions and photos, and see just how easy it is to improve your full size Chevy’s axle articulation.
Installation:
 First off, we chocked the rear wheels and made sure the transmission was in park. Next was to loosen the 2 large, stock sway bar bolts from the spring pad plates and remove them. Then loosen the 4 bolts on the swaybar brackets and slide the swaybar up and out of the way. We suggest that you install one flat washer between the swaybar mounting brackets (front side only) and retighten the bolts. This will allow you to slide the sway bar up and out of the way with out having to loosen the bolts to do so. It shouldn’t be so loose that it just flops around, but tight enough so that it takes some effort to move the sway bar up and down.
 After this is accomplished, take the new Offroad Design brackets and install them along with the new bolts provided in the kit where the sway bar bolted to the u-bolt plates above the springs. NOTE: DO NOT tighten completely until last step. It will be necessary to pivot the sway bar up slightly to allow room for the brackets. At this stage, this would be a good time to consider replacing the stock rubber sway bar bushings with new poly bushings due to the fact that the kit comes with new ploy bushings at the sway bar ends where they attach to the disconnect kit.
 Next, install the large pins included in the kit through the sway bar and bracket. Secure the large pins by installing the smaller (hood) pins into the holes that are drilled in the large pins. This is why we had you wait to tighten the brackets completely. The brackets need to be moved back and forth so that the sway bar can line up correctly. The sway bar will also need to be moved over towards the passenger side of the truck (in its mounts) slightly because the kit adds a little width to the location where the sway bar originally attached.
 The last step is to install the small bracket provided in the kit to the existing right bump stop bolt. This is such a simple, but ingenious, idea. Its job is to hold up the sway bar when it is not in use. And that’s it! This install took us about a half-hour and the results are remarkable. Seeing the reaction of fellow four wheelers, when the full sized Blazer out drooped a The last step is to install the small bracket provided in the kit to the existing right bump stop bolt. This is such a simple, but ingenious, idea. Its job is to hold up the sway bar when it is not in use. And that’s it! This install took us about a half-hour and the results are remarkable. Seeing the reaction of fellow four wheelers, when the full sized Blazer out drooped a |
| Description | Notes | Rating |
| Ease of Install | Took roughly 45 minutes… Very easy install |  |
| Ease of Use | Just pull the pin and swing the sway bar up out of the way. | |
| Performance | I don’t think this unit will give up even in the distant future. | |
| Durability | Super fabrication on behalf of the Offroad Design guys. Durability should not be an issue | |
| Appearance | Awesome. Already had some people ask “what is that on your sway bar” |  |
| Drivability | On road, no change from stock. Off road, night and day difference. | |
| Comfort | N/A | N/A |
| Price in comparison to related products | Roughly 10% cheaper than it’s competitor. | |
| Was it worth it??? | If you can’t tell from this review… | |
| Tools Required | 1/2 inch drive ratchet, 3/8 inch drive ratchet, 1 1/8-inch socket, 9/16 wrench or socket. | |
| Editors Notes | This, as stated above, is a huge suspension upgrade for little out of pocket money. Only precaution is this, if you should disconnect the sway bar before hitting the trail, take time in getting used to what it feels like not having a sway bar. Believe me, it will surprise you. | |