4x4Review Off Road Magazine

Everyone wants it. Heck, all the kids are doing it these days. But adding more can get really expensive really quick, and in these tough economic times, it’s nice to know that there are big brain engineers out there, hard at work, chasing the same quest, with tight budgets and high quality at the forefront of their mind. Our ’74 FJ40 was in desperate need of some too, as those spring-under leaf springs just weren’t putting out. We’re talking about axle articulation.
 He knew that other dual-shackles gave you the added articulation, but carried some baggage with them, such as shackle inversion, component failure, twisting and dangerous unloading – a condition where the shackles can suddenly and unexpectedly fly open, potentially causing an end-over-end rollover – not good.
 Installation
Installation of the RockSplitter shackles isn’t overly difficult, but will take several hours for the average Joe to install in his garage. It is also highly recommended that a welder be used (for added safety reasons), but it is not required.
 The first step in installation of the RockSplitter shackles is to read the instructions a few times, get out your trusty tape measure and a sharpie marker. You will need to mark the vertical centerline of the original spring hanger eyelet as it relates to the frame (see silver marking labeled “orig”). The first step in installation of the RockSplitter shackles is to read the instructions a few times, get out your trusty tape measure and a sharpie marker. You will need to mark the vertical centerline of the original spring hanger eyelet as it relates to the frame (see silver marking labeled “orig”). |
 You will then need to remove your original shackles from the spring hanger and the leaf springs. Use proper jacking techniques and jackstands, of course. You will then need to remove your original shackles from the spring hanger and the leaf springs. Use proper jacking techniques and jackstands, of course. |
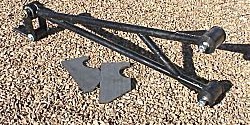
   Next, you’ll need to cut the original spring hanger off of the frame and then prepare it for future welding and drilling. For our FJ40, this required that we grind off the rivets, drill them out, cut the factory welds, and then swing a manly-sized sledgehammer at them until they cried uncle, and went crashing to the floor. We also took the time to stitch-weld the lower frame plate to the frame for some added strength. Next, you’ll need to cut the original spring hanger off of the frame and then prepare it for future welding and drilling. For our FJ40, this required that we grind off the rivets, drill them out, cut the factory welds, and then swing a manly-sized sledgehammer at them until they cried uncle, and went crashing to the floor. We also took the time to stitch-weld the lower frame plate to the frame for some added strength. |
 Before we started the drilling, bolting, welding steps, we did a few dry-run installations of the RockSplitter shackles by assembling them onto the passenger rear leaf spring, marked its appropriate location with a silver Sharpie marker (see marking labeled “good”) and tack welded / c-clamped it into place. We then articulated the rear suspension with a floor jack to ensure the shackle moved freely, was positioned correctly and was plumb with the frame. Once we were confident that everything was perfect, we marked the upper shackle plate’s location in several places to the frame, and then marked the areas where we needed to drill the holes for the grade 8 mounting hardware with a center punch. Before we started the drilling, bolting, welding steps, we did a few dry-run installations of the RockSplitter shackles by assembling them onto the passenger rear leaf spring, marked its appropriate location with a silver Sharpie marker (see marking labeled “good”) and tack welded / c-clamped it into place. We then articulated the rear suspension with a floor jack to ensure the shackle moved freely, was positioned correctly and was plumb with the frame. Once we were confident that everything was perfect, we marked the upper shackle plate’s location in several places to the frame, and then marked the areas where we needed to drill the holes for the grade 8 mounting hardware with a center punch. |
 Next, drill the holes that you’ve marked on the frame, and then disassemble the RockSplitter shackle assembly. Bolt the upper shackle plate to the frame. For those FJ40 readers out there, the bolt locations on the upper bracket were tough to deal with due to the FJ’s multi-layered, complex, double C-channel frame and gusset setup, which ultimately caused some of the bolts that sit at slight angles. [ed: FrameOff has since re-designed the upper brackets’ hole patterns in their production RockSplitter assemblies to accommodate diverse applications, thus this is no longer an issue.] Next, drill the holes that you’ve marked on the frame, and then disassemble the RockSplitter shackle assembly. Bolt the upper shackle plate to the frame. For those FJ40 readers out there, the bolt locations on the upper bracket were tough to deal with due to the FJ’s multi-layered, complex, double C-channel frame and gusset setup, which ultimately caused some of the bolts that sit at slight angles. [ed: FrameOff has since re-designed the upper brackets’ hole patterns in their production RockSplitter assemblies to accommodate diverse applications, thus this is no longer an issue.] |
  With the upper shackle plate installed, place a few strategically located welds in place for added safety. We chose to weld the font and rear of the upper shackle plate, as well as some stitch welds on the sides. With the upper shackle plate installed, place a few strategically located welds in place for added safety. We chose to weld the font and rear of the upper shackle plate, as well as some stitch welds on the sides. |
  Assemble the shackles to the leaf springs with the supplied polyurethane bushings and then attach the RockSplitter outer assemblies to the shackles and the upper mounting plate. Torque the nuts and bolts per the instructions. Rinse, lather and repeat on the other side. You’re done. Assemble the shackles to the leaf springs with the supplied polyurethane bushings and then attach the RockSplitter outer assemblies to the shackles and the upper mounting plate. Torque the nuts and bolts per the instructions. Rinse, lather and repeat on the other side. You’re done. |
The Verdict
 The RockSplitter dual-stage, dual-shackle system in truly amazing. Having both an on-road and an off-road setting is not only ingenious, but very welcome in our daily driver / off-road rigs, and works perfectly. Speaking of driving on the street… we spent 20 or so minutes driving our FJ40 around some twisty roads with the RockSplitter in the “on-road” setting. Even though our shackles provided 1 more inch of lift (we ordered it that way), we couldn’t tell that they weren’t factory spring hangers. There was no difference in ride whatsoever.
OK, so you’re probably wondering how much extra travel we gained with the RockSplitter shackle system. We took some measurements from top of tire to bottom of wheel-well opening, fully extended with the old shackles in place, and then took our second measurement with the pins pulled (off-road mode) and fully flexed with the RockSplitter shackles installed. We netted an additional 5” of travel, which is quite a bit. We believe though, that our current shock absorber installation is preventing us from getting another 1-2” of downward travel though, and we’ll report on this a bit later.
Overall, the RockSplitter dual-shackle is an incredibly well-built system. It’s engineered incredibly well, likely a byproduct of their simplicity, and performs as advertised. They perform so well in fact, that my coming winter plans to install a 4-link suspension system are now on indefinite hold.
So, if you want to lay your hands on a set of RockSplitter shackles made in the USA with 100% USA materials, and put some American dollars right back into our American economy, call FrameOff Equipment Company, and tell them we sent you, you won’t regret it.
| FrameOff Equipment Company |
| FrameOff Equipment Company P.O. Box 320396 Los Gatos, CA 95032 Phone: 1-866-350-0045 Email: customerservice@frameoff.com Web: www.frameoff.com |